shadcn-ui实现原理

Shadcn ui 是最近比较火的一个 React 组件库,官方介绍其并非组件库,因为它并非基于 npm package 的形式来维护,而是通过 nodejs 命令支持将组件源码直接复制到你的项目中。
本篇文章从使用到分析 shadcn cli 命令源码的实现,来深入了解这个组件库内部的一些原理。
使用
初始化
shadcn ui 依赖于 tailwindcss,所以使用 shadcn ui 的组件需要安装和配置 tailwindcss,这里就不细说了。
tailwindcss 安装完就可以使用 shadcn ui 提供的 cli 工具来初始化一些配置了:
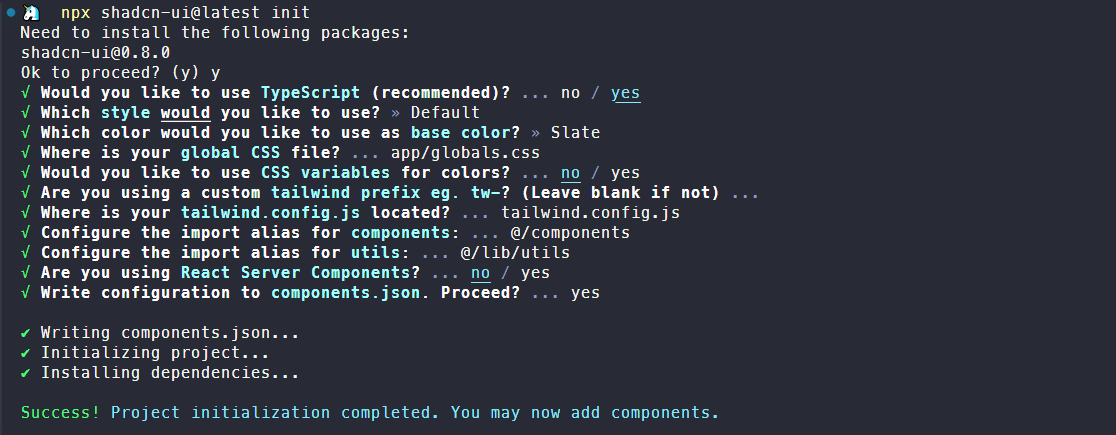
npx shadcn-ui@latest init
执行init命令会询问下面一堆问题,然后可以看到项目内部多了components目录(如果已存在则不变),还有一个components.json文件。
// components.json
{
  "$schema": "https://ui.shadcn.com/schema.json",
  // 组件样式
  "style": "default",
  // 是否 rsc 组件
  "rsc": false,
  // 是否使用 typescript
  "tsx": true,
  // tailwind 的一些配置
  "tailwind": {
    "config": "tailwind.config.js",
    "css": "app/globals.css",
    "baseColor": "slate",
    "cssVariables": false,
    "prefix": ""
  },
  // shadcn 组件使用到的 utils 函数的引用路径,以及相互之间引用的相对路径
  "aliases": {
    "components": "@/components",
    "utils": "@/lib/utils"
  }
}
添加组件
使用 cli 命令添加 shadcn ui 具有的组件,比如添加一个button组件
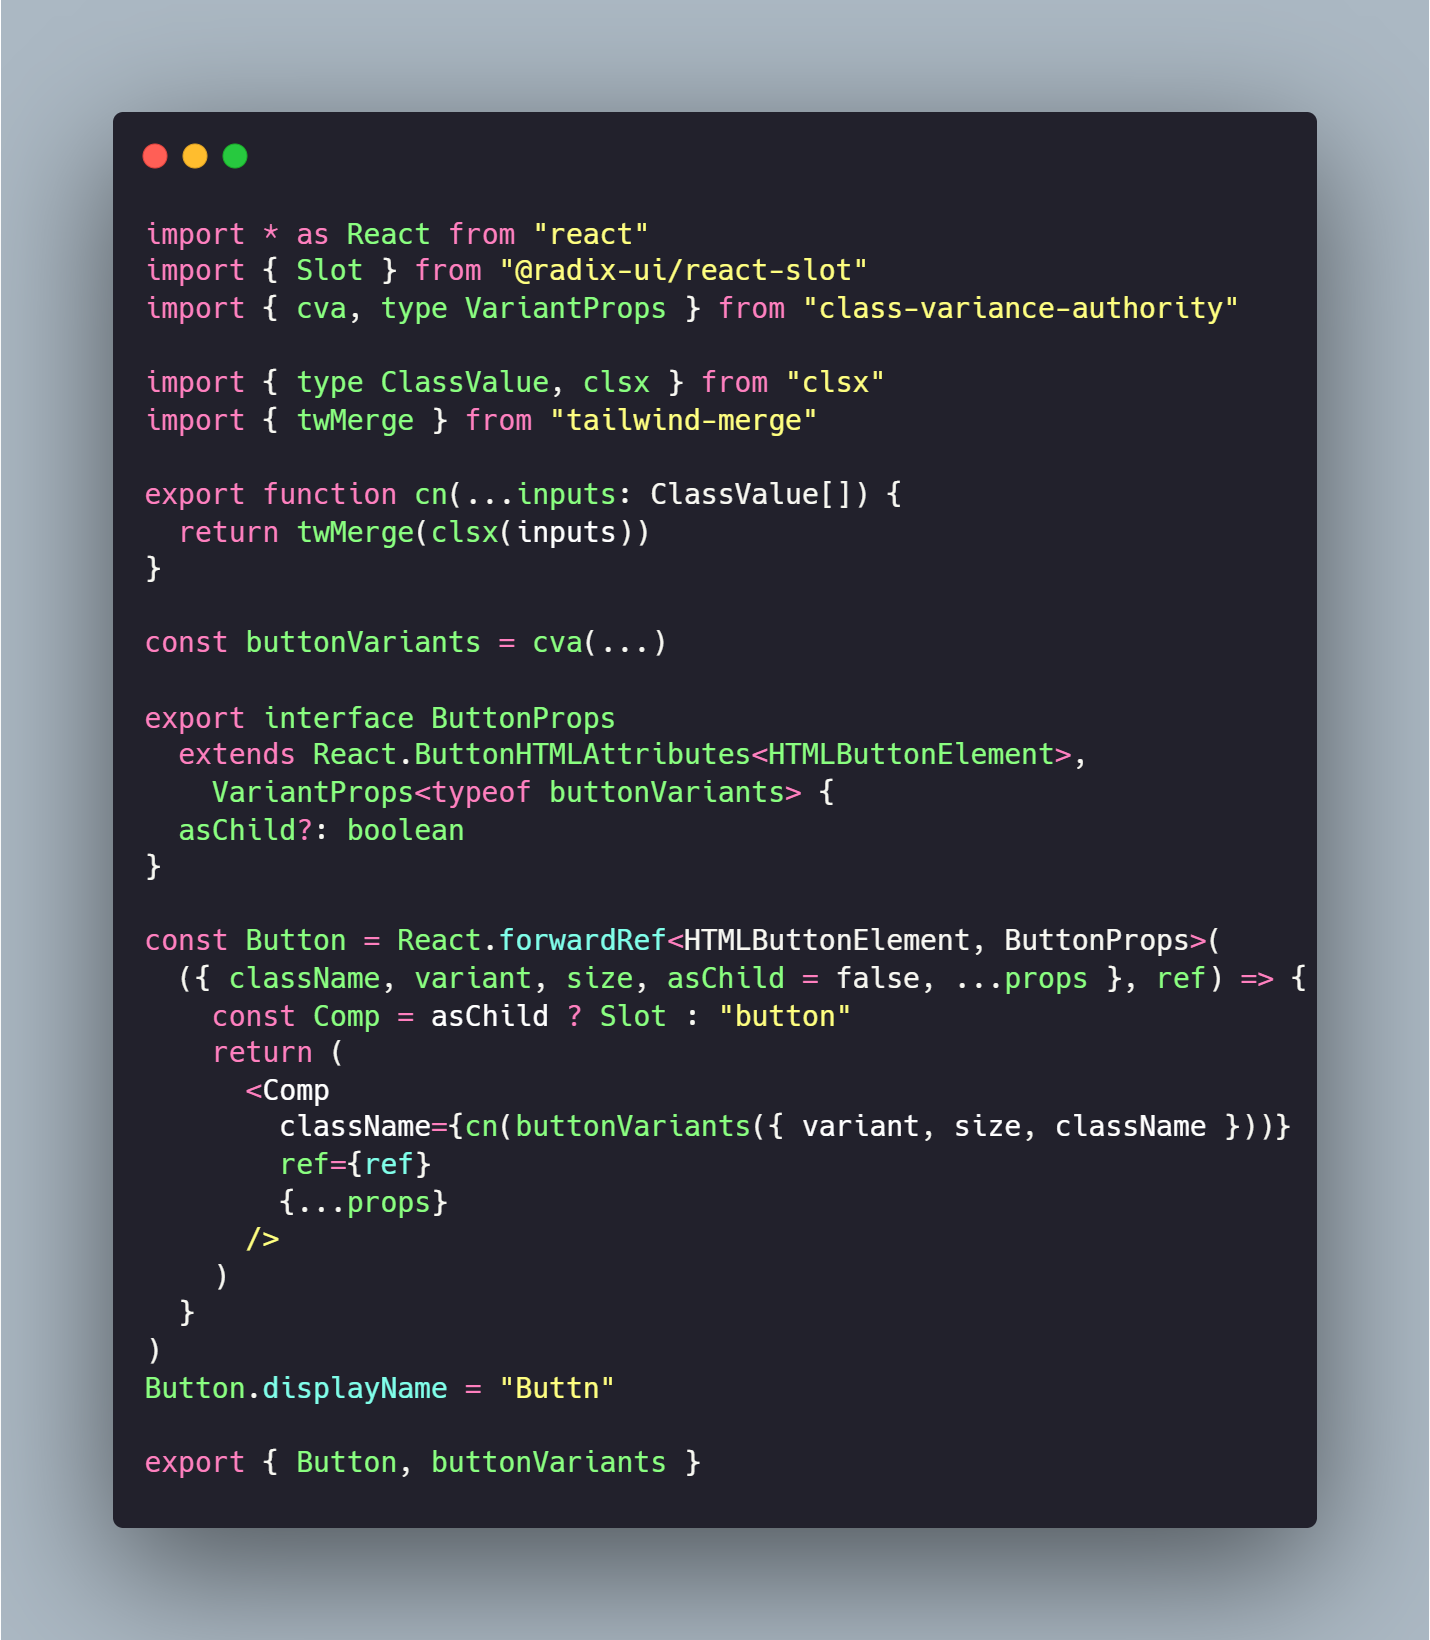
npx shadcn-ui@latest add button
执行完上面这行命令,就会往components目录下写入button组件代码,这个组件实现比较简单,源码就是下面这样。可以看到其内部还依赖了一个组件库@radix-ui/react-slot,(这不是套娃吗😅)
更新组件
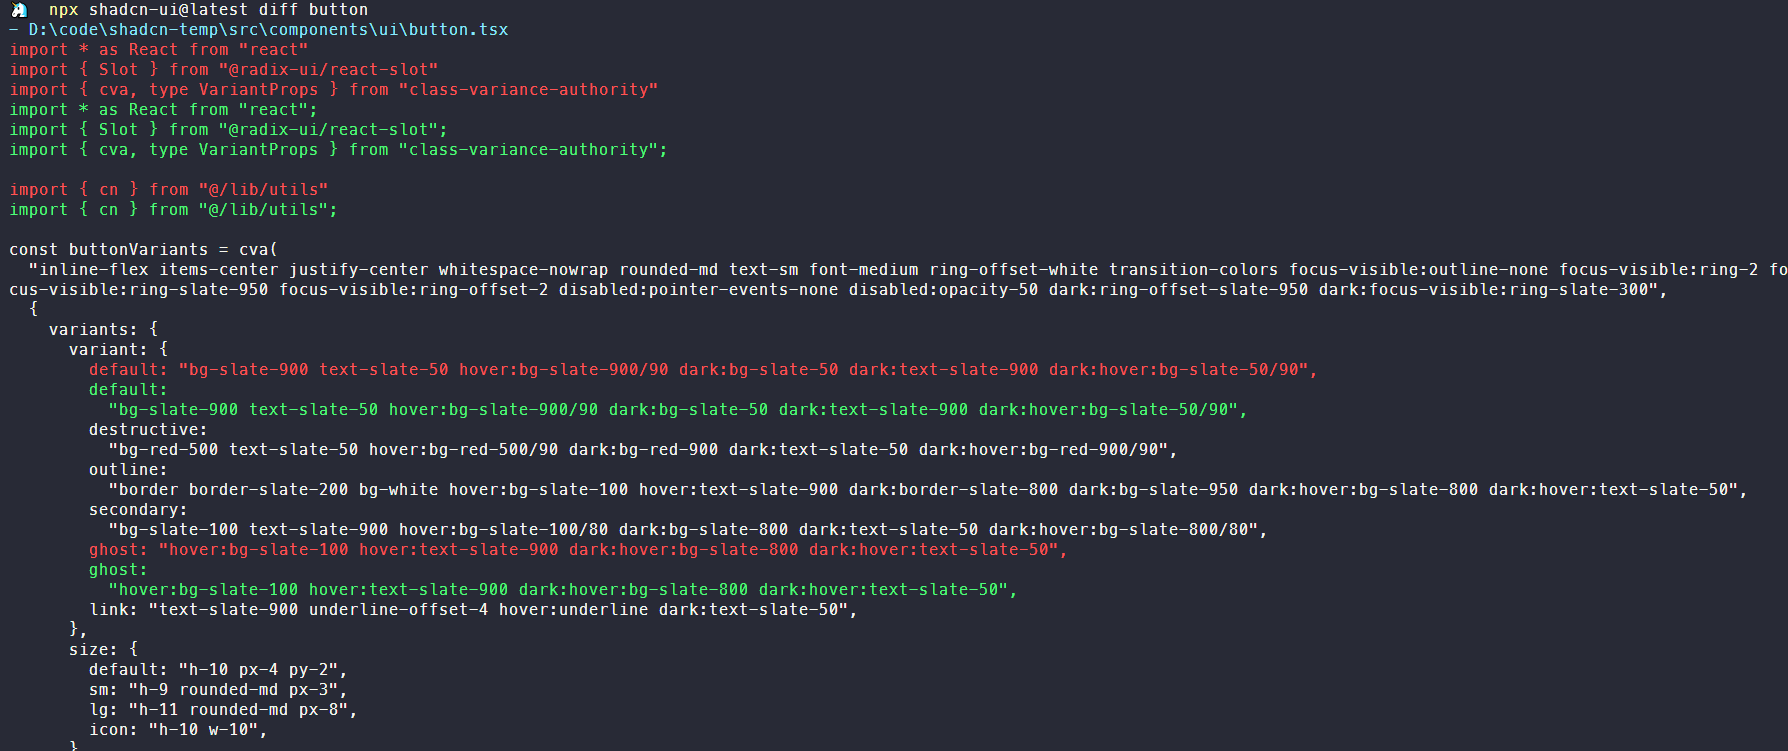
shadcn 的 cli 还有一个diff命令用于显示组件更新,执行diff button可以看到其会在终端显示远端和本地存在不同的代码行,通过蓝绿色区分开,说实话,这功能感觉比较鸡肋。
monorepo 支持
shadcn ui提供的三个 cli 命令都支持通过--cwd来指定项目的根目录,也算是支持monorepo吧。
cli解析
shadcn 的 cli 代码基于 pnpm workspace 的结构,虽然是 monorepo 项目,但 workspace 下只有一个 cli 项目,代码目录结构还是很简洁清晰的。
src/commands下对应三个命令的执行文件,在index.ts内部引用,并通过Command注册。
src
 ┣ commands
 ┃ ┣ add.ts
 ┃ ┣ diff.ts
 ┃ ┗ init.ts
 ┣ utils
 ┗ index.ts
import { add } from "@/src/commands/add"
import { diff } from "@/src/commands/diff"
import { init } from "@/src/commands/init"
import { Command } from "commander"

import { getPackageInfo } from "./utils/get-package-info"

process.on("SIGINT", () => process.exit(0))
process.on("SIGTERM", () => process.exit(0))

async function main() {
  const packageInfo = await getPackageInfo()

  const program = new Command()
    .name("shadcn-ui")
    .description("add components and dependencies to your project")
    .version(
      packageInfo.version || "1.0.0",
      "-v, --version",
      "display the version number"
    )

  program.addCommand(init).addCommand(add).addCommand(diff)

  program.parse()
}

main()
init
init方法如下,正如init命令定义的描述那样initialize your project and install dependencies,其主要工作其实就两步:
- 使用
promptForConfig方法,通过命令行交互获取用户输入的配置信息 - 使用
runInit方法生成配置文件components.json和存放utils,components的目录
import { z } from "zod"

const initOptionsSchema = z.object({
  cwd: z.string(),
  yes: z.boolean(),
  defaults: z.boolean(),
})

export const init = new Command()
  .action(async (opts) => {
    try {
      // 使用 zod 校验并获取命令行输入
      const options = initOptionsSchema.parse(opts)
      const cwd = path.resolve(options.cwd)

      // 检测是否具有 tailwind 配置文件 tailwind.config.(js|ts),没有则报错
      preFlight(cwd)

      // 获取目录下components.json配置文件内容
      const projectConfig = await getProjectConfig(cwd)
      if (projectConfig) {
        // 如果是 nextjs+typescript 项目且存在 tailwind base 配置和 tsconfig paths 配置,则执行简单化问题交互
        const config = await promptForMinimalConfig(
          cwd,
          projectConfig,
          opts.defaults
        )
        // 执行生成文件步骤
        await runInit(cwd, config)
      } else {
        const existingConfig = await getConfig(cwd)
        // 使用 prompts 询问全部问题
        const config = await promptForConfig(cwd, existingConfig, options.yes)
        await runInit(cwd, config)
      }

      logger.info("")
      logger.info(
        `${chalk.green(
          "Success!"
        )} Project initialization completed. You may now add components.`
      )
      logger.info("")
    } catch (error) {
      handleError(error)
    }
  })
promptForConfig
promptForConfig方法源码如下,其主要工作就是三步:
- 从远端加载 shadcn 支持的主题和基础色配置信息,这部分信息需要在命令行交互内使用,提示用户选择
- 使用命令行交互获取用户偏好配置;
- 生成 components.json 配置文件;
- 最后返回解析配置的结果
export async function promptForConfig(
  cwd: string,
  defaultConfig: Config | null = null,
  skip = false
) {
  // 获取远端主题配置,https://ui.shadcn.com/registry/styles/index.json
  const styles = await getRegistryStyles()
  // 获取组件基础色配置
  const baseColors = await getRegistryBaseColors()

  // 命令行输入交互
  const options = await prompts([...])

  // 校验输入
  const config = rawConfigSchema.parse({...})

  // 生成 components.json 配置文件
  logger.info("")
  const spinner = ora(`Writing components.json...`).start()
  const targetPath = path.resolve(cwd, "components.json")
  await fs.writeFile(targetPath, JSON.stringify(config, null, 2), "utf8")
  spinner.succeed()

  // 返会配置解析信息,包括解析得到的 components 存放目录绝对路径等信息
  return await resolveConfigPaths(cwd, config)
}

// 从远端获取主题配置文件
export async function getRegistryStyles() {
  try {
    const [result] = await fetchRegistry(["styles/index.json"])

    return stylesSchema.parse(result)
  } catch (error) {
    throw new Error(`Failed to fetch styles from registry.`)
  }
}

// 获取主题色配置
export async function getRegistryBaseColors() {
  return [
    {
      name: "slate",
      label: "Slate",
    },
    {
      name: "gray",
      label: "Gray",
    },
    {
      name: "zinc",
      label: "Zinc",
    },
    {
      name: "neutral",
      label: "Neutral",
    },
    {
      name: "stone",
      label: "Stone",
    },
  ]
}
fetchRegistry
promptForConfig内部使用的fetchRegistry方法,默认从https://ui.shadcn.com域名拉取配置,这个域名也就是shadcn ui 官方文档的域名地址。https://ui.shadcn.com/registry/styles/index.json获取一份主题配置,对应components.json的style
const baseUrl = process.env.COMPONENTS_REGISTRY_URL ?? "https://ui.shadcn.com"

async function fetchRegistry(paths: string[]) {
  try {
    const results = await Promise.all(
      paths.map(async (path) => {
        const response = await fetch(`${baseUrl}/registry/${path}`, {
          agent,
        })
        return await response.json()
      })
    )

    return results
  } catch (error) {
    console.log(error)
    throw new Error(`Failed to fetch registry from ${baseUrl}.`)
  }
}
resolveConfigPaths
resolveConfigPaths内部使用tsconfig-paths的createMatchPath方法来对tconfig.json中定义的paths字段进行解析,可以得到一个绝对路径。
import { loadConfig, createMatchPath, type ConfigLoaderSuccessResult } from "tsconfig-paths"

export async function resolveConfigPaths(cwd: string, config: RawConfig) {
  // 读取项目的tsconfig.json文件
  const tsConfig = await loadConfig(cwd)

  return configSchema.parse({
    ...config,
    resolvedPaths: {
      ...,
      // 解析相对路径得到绝对路径
      utils: await resolveImport(config.aliases["utils"], tsConfig),
      components: await resolveImport(config.aliases["components"], tsConfig),
      ui: config.aliases["ui"]
        ? await resolveImport(config.aliases["ui"], tsConfig)
        : await resolveImport(config.aliases["components"], tsConfig),
    },
  })
}

// 从 components.json 中定义的 aliases.utils,aliases.components 相对路径解析得到绝对路径
export async function resolveImport(
  importPath: string,
  config: Pick<ConfigLoaderSuccessResult, "absoluteBaseUrl" | "paths">
) {
  return createMatchPath(config.absoluteBaseUrl, config.paths)(
    importPath,
    undefined,
    () => true,
    [".ts", ".tsx"]
  )
}
createMatchPath一般配合loadConfig使用,首先使用loadConfig读取项目的tsconfig.json文件,其返回项目根目录的绝对路径absoluteBaseUrl。loadConfig函数签名如下:
export interface ConfigLoaderSuccessResult {
    resultType: "success";
    // tsconfig.json 的绝对路径
    configFileAbsolutePath: string;
    // tsconfig.json 定义的 baseUrl
    baseUrl?: string;
    // 基于 baseUrl 的项目绝对路径
    absoluteBaseUrl: string;
    // tsconfig.json 定义的 paths
    paths: {
        [key: string]: Array<string>;
    };
    mainFields?: (string | string[])[];
    addMatchAll?: boolean;
}
export interface ConfigLoaderFailResult {
    resultType: "failed";
    message: string;
}
export declare type ConfigLoaderResult = ConfigLoaderSuccessResult | ConfigLoaderFailResult;
export declare function loadConfig(cwd?: string): ConfigLoaderResult;
例如对于下面一个项目结构返回的absoluteBaseUrl如下,注意absoluteBaseUrl会根据baseUrl变化,一般是项目根目录后面串接baseUrl部分路径,所以不推荐项目使用baseUrl,影响的范围不可控。
tsconfig-path-test
├─ src
│  └─ index.ts
├─ package.json
└─ tsconfig.json
{
  resultType: 'success',
  configFileAbsolutePath: 'D:\\code\\tsconfig-path-test\\tsconfig.json',
  baseUrl: undefined,
  absoluteBaseUrl: 'D:\\code\\tsconfig-path-test',
  paths: { '@/*': [ './src/*' ] },
  addMatchAll: false
}
从loadConfig获取到项目根目录的绝对路径以后,就可以传入createMatchPath方法,createMatchPath函数签名如下:
/**
 * 匹配路径的方法
 */
export interface MatchPath {
    (requestedModule: string, readJson?: Filesystem.ReadJsonSync, fileExists?: (name: string) => boolean, extensions?: ReadonlyArray<string>): string | undefined;
}
/**
 * 创建一个解析 tsconfig.json 中 paths 配置的路径的函数
 *
 * @param absoluteBaseUrl 根据 baseUrl 定义的项目根目录
 * @param paths tsconfig.json 定义的 paths
 * @param mainFields A list of package.json field names to try when resolving module files. Select a nested field using an array of field names.
 * @param addMatchAll Add a match-all "*" rule if none is present
 */
export declare function createMatchPath(absoluteBaseUrl: string, paths: {
    [key: string]: Array<string>;
}, mainFields?: (string | string[])[], addMatchAll?: boolean): MatchPath;
所以上面的resolveImport方法对@/components,@/lib/utils这样的相对路径,解析可以得到其绝对路径如D:\code\tsconfig-path-test\src\components。
runInit
runInit方法负责生成components,utils等目录,以及替换tailwind.config.ts配置,并安装 shadcn ui 需要的第三方组件库依赖tailwindcss-animate,class-variance-authority,clsx等。
export async function runInit(cwd: string, config: Config) {
  // 生成 components,utils 目录
  for (const [key, resolvedPath] of Object.entries(config.resolvedPaths)) {
    let dirname = path.extname(resolvedPath)
      ? path.dirname(resolvedPath)
      : resolvedPath

    if (!existsSync(dirname)) {
      await fs.mkdir(dirname, { recursive: true })
    }
  }

  const extension = config.tsx ? "ts" : "js"

  const tailwindConfigExtension = path.extname(
    config.resolvedPaths.tailwindConfig
  )

  let tailwindConfigTemplate: string
  if (tailwindConfigExtension === ".ts") {
    tailwindConfigTemplate = config.tailwind.cssVariables
      ? templates.TAILWIND_CONFIG_TS_WITH_VARIABLES
      : templates.TAILWIND_CONFIG_TS
  } else {
    tailwindConfigTemplate = config.tailwind.cssVariables
      ? templates.TAILWIND_CONFIG_WITH_VARIABLES
      : templates.TAILWIND_CONFIG
  }

  // 使用lodash的template方法往tailwind.config里写入一些配置项
  await fs.writeFile(
    config.resolvedPaths.tailwindConfig,
    template(tailwindConfigTemplate)({
      extension,
      prefix: config.tailwind.prefix,
    }),
    "utf8"
  )

  // 从https://ui.shadcn.com/registry/colors/[baseColor].json获取主题色配置文件,写入到tailwind 全局 css 文件里
  const baseColor = await getRegistryBaseColor(config.tailwind.baseColor)
  if (baseColor) {
    await fs.writeFile(
      config.resolvedPaths.tailwindCss,
      config.tailwind.cssVariables
        ? config.tailwind.prefix
          ? applyPrefixesCss(baseColor.cssVarsTemplate, config.tailwind.prefix)
          : baseColor.cssVarsTemplate
        : baseColor.inlineColorsTemplate,
      "utf8"
    )
  }

  // 生成 utils.cn 文件
  await fs.writeFile(
    `${config.resolvedPaths.utils}.${extension}`,
    extension === "ts" ? templates.UTILS : templates.UTILS_JS,
    "utf8"
  )

  // 安装依赖
  const dependenciesSpinner = ora(`Installing dependencies...`)?.start()
  const packageManager = await getPackageManager(cwd)
  const deps = [
    ...[
      "tailwindcss-animate",
      "class-variance-authority",
      "clsx",
      "tailwind-merge"
    ],
    config.style === "new-york" ? "@radix-ui/react-icons" : "lucide-react",
  ]

  await execa(
    packageManager,
    [packageManager === "npm" ? "install" : "add", ...deps],
    {
      cwd,
    }
  )
  dependenciesSpinner?.succeed()
}
getPackageManager
getPackageManager方法获取项目使用的依赖管理工具,这个方法非常实用,万能!
import { execa } from "execa";
import { detect } from "@antfu/ni"

const packageManager = await getPackageManager(cwd);

// 执行 install 安装依赖
await execa(
  packageManager,
  [packageManager === "npm" ? "install" : "add", ...[
    "tailwindcss-animate",
    "class-variance-authority",
    "clsx",
    "tailwind-merge",
    config.style === "new-york" ? "@radix-ui/react-icons" : "lucide-react",
  ]],
  {
    cwd,
  }
)

// 检测当前使用的 npm package 管理工具
export async function getPackageManager(
  targetDir: string
): Promise<"yarn" | "pnpm" | "bun" | "npm"> {
  const packageManager = await detect({ programmatic: true, cwd: targetDir })

  if (packageManager === "yarn@berry") return "yarn"
  if (packageManager === "pnpm@6") return "pnpm"
  if (packageManager === "bun") return "bun"

  return packageManager ?? "npm"
}
add
add命令的实现也比较简单,其主要实现部分的源码如下,可拆解为以下四步:
- 使用
getRegistryIndex获取 shadcn 注册支持的所有组件及其依赖; - 使用
resolveTree解析用户添加的组件,及其依赖的其他内部组件; - 通过
fetchTree拉取组件源码; - 使用
transform转换组件源码并生成文件
const add = new Command()
  .name("add")
  .argument("[components...]", "the components to add")
  .option("-y, --yes", "skip confirmation prompt.", true)
  .option("-o, --overwrite", "overwrite existing files.", false)
  .option(
    "-c, --cwd <cwd>",
    "the working directory. defaults to the current directory.",
    process.cwd()
  )
  .option("-a, --all", "add all available components", false)
  .option("-p, --path <path>", "the path to add the component to.")
  .action(async (components, opts) => {
    try {
      // 校验命令行参数
      const options = addOptionsSchema.parse({
        components,
        ...opts,
      })

      // 获取项目根目录绝对路径
      const cwd = path.resolve(options.cwd)

      // 读取项目根目录的配置文件 components.json
      const config = await getConfig(cwd)

      // 默认从 https://ui.shadcn.com/registry/index.json 获取注册组件列表
      const registryIndex = await getRegistryIndex()

      let selectedComponents = options.all
        ? registryIndex.map((entry) => entry.name)
        : options.components

      // 获取所有要添加的组件信息
      const tree = await resolveTree(registryIndex, selectedComponents)
      // 获取组件源码
      const payload = await fetchTree(config.style, tree)
      const baseColor = await getRegistryBaseColor(config.tailwind.baseColor)

      // 生成组件代码文件
      const spinner = ora(`Installing components...`).start()
      for (const item of payload) {
        const targetDir = await getItemTargetPath(
          config,
          item,
          options.path ? path.resolve(cwd, options.path) : undefined
        )

        for (const file of item.files) {
          let filePath = path.resolve(targetDir, file.name)

          // 对组件源码内部 import 路径等进行AST解析并替换
          const content = await transform({
            filename: file.name,
            raw: file.content,
            config,
            baseColor,
          })

          await fs.writeFile(filePath, content)
        }

        // 安装组件依赖
        const packageManager = await getPackageManager(cwd)

        // 安装依赖
        if (item.dependencies?.length) {
          await execa(
            packageManager,
            [
              packageManager === "npm" ? "install" : "add",
              ...item.dependencies,
            ],
            {
              cwd,
            }
          )
        }
      }
      spinner.succeed(`Done.`)
    } catch (error) {
      handleError(error)
    }
  })
getRegistryIndex
getRegistryIndex会默认从一个远端地址——index.json加载一个组件json,这个json包含了 shadcn ui 所有支持的组件信息。
const registryIndex = await getRegistryIndex()

export async function getRegistryIndex() {
  try {
    const [result] = await fetchRegistry(["index.json"])

    return registryIndexSchema.parse(result)
  } catch (error) {
    throw new Error(`Failed to fetch components from registry.`)
  }
}
例如我们添加的button组件的信息如下:
[
  {
      "name": "button",
      "dependencies": [
          "@radix-ui/react-slot"
      ],
      "files": [
          "ui/button.tsx"
      ],
      "type": "components:ui"
  }
]
json的schema描述如下,从代码的 TODO 注释可以看出 shadcn 的维护者有意将该部分注册组件的 schema 共享出去,应该是为了更方便组件库的维护者使用。
// TODO: 提取为一个 package
export const registryItemSchema = z.object({
  name: z.string(),  // 组件名称
  dependencies: z.array(z.string()).optional(),  // 组件依赖的第三方 package
  devDependencies: z.array(z.string()).optional(),  // 组件开发依赖
  registryDependencies: z.array(z.string()).optional(), // 组件依赖的其他 shadcn ui 内部的组件
  files: z.array(z.string()),  // 组件包含的文件列表,相对路径
  type: z.enum(["components:ui", "components:component", "components:example"]), // 组件类型
})

export const registryIndexSchema = z.array(registryItemSchema)
resolveTree
在获取到远端注册的所有 shadcn ui 内部组件的信息后,resolveTree会对用户选择添加的组件进行依赖解析,得到所有需要添加到项目内部的组件信息。
const tree = await resolveTree(registryIndex, selectedComponents)

/**
 * 解析组件依赖关系,得到所有需要添加到项目内部的组件信息
 * @param index 所有注册的组件信息
 * @param names 用户选择添加的组件
 */
export async function resolveTree(
  index: z.infer<typeof registryIndexSchema>,
  names: string[]
) {
  const tree: z.infer<typeof registryIndexSchema> = []

  for (const name of names) {
    const entry = index.find((entry) => entry.name === name)

    if (!entry) {
      continue
    }

    // 用户添加的组件本身
    tree.push(entry)

    // 添加的组件所依赖的 shadcn ui 内部的组件也需要被添加
    if (entry.registryDependencies) {
      const dependencies = await resolveTree(index, entry.registryDependencies)
      tree.push(...dependencies)
    }
  }

  // 过滤不同组件之间依赖的相同的组件
  return tree.filter(
    (component, index, self) =>
      self.findIndex((c) => c.name === component.name) === index
  )
}
fetchTree
在获取所有要添加的组件后,使用fetchTree从远端加载其源码。
const payload = await fetchTree(config.style, tree)

/**
 * 加载组件源码
 * @param style components.json 指定的 style
 * @param tree 用户选择添加的组件
 */
export async function fetchTree(
  style: string,
  tree: z.infer<typeof registryIndexSchema>
) {
  try {
    const paths = tree.map((item) => `styles/${style}/${item.name}.json`)
    const result = await fetchRegistry(paths)

    return registryWithContentSchema.parse(result)
  } catch (error) {
    throw new Error(`Failed to fetch tree from registry.`)
  }
}
例如button组件,从https://ui.shadcn.com/registry/styles/default/button.json获取到其源码信息为:
{
    "name": "button",
    "dependencies": [
        "@radix-ui/react-slot"
    ],
    "files": [
        {
            "name": "button.tsx",
            "content": "import * as React from \"react\"\nimport { Slot } from \"@radix-ui/react-slot\"\nimport { cva, type VariantProps } from \"class-variance-authority\"\n\nimport { cn } from \"@/lib/utils\"\n\nconst buttonVariants = cva(\n  \"inline-flex items-center justify-center whitespace-nowrap rounded-md text-sm font-medium ring-offset-background transition-colors focus-visible:outline-none focus-visible:ring-2 focus-visible:ring-ring focus-visible:ring-offset-2 disabled:pointer-events-none disabled:opacity-50\",\n  {\n    variants: {\n      variant: {\n        default: \"bg-primary text-primary-foreground hover:bg-primary/90\",\n        destructive:\n          \"bg-destructive text-destructive-foreground hover:bg-destructive/90\",\n        outline:\n          \"border border-input bg-background hover:bg-accent hover:text-accent-foreground\",\n        secondary:\n          \"bg-secondary text-secondary-foreground hover:bg-secondary/80\",\n        ghost: \"hover:bg-accent hover:text-accent-foreground\",\n        link: \"text-primary underline-offset-4 hover:underline\",\n      },\n      size: {\n        default: \"h-10 px-4 py-2\",\n        sm: \"h-9 rounded-md px-3\",\n        lg: \"h-11 rounded-md px-8\",\n        icon: \"h-10 w-10\",\n      },\n    },\n    defaultVariants: {\n      variant: \"default\",\n      size: \"default\",\n    },\n  }\n)\n\nexport interface ButtonProps\n  extends React.ButtonHTMLAttributes<HTMLButtonElement>,\n    VariantProps<typeof buttonVariants> {\n  asChild?: boolean\n}\n\nconst Button = React.forwardRef<HTMLButtonElement, ButtonProps>(\n  ({ className, variant, size, asChild = false, ...props }, ref) => {\n    const Comp = asChild ? Slot : \"button\"\n    return (\n      <Comp\n        className={cn(buttonVariants({ variant, size, className }))}\n        ref={ref}\n        {...props}\n      />\n    )\n  }\n)\nButton.displayName = \"Button\"\n\nexport { Button, buttonVariants }\n"
        }
    ],
    "type": "components:ui"
}
transform
在得到组件源码以后,从components.json中解析配置项aliases.components,得到项目存放组件的目录路径,然后使用transform方法对组件源码进行解析,并最终生成组件文件。
for (const item of payload) {
  for (const file of item.files) {
    let filePath = path.resolve(targetDir, file.name)

    // Run transformers.
    const content = await transform({
      filename: file.name,
      raw: file.content,
      config,
      baseColor,
    })

    if (!config.tsx) {
      filePath = filePath.replace(/\.tsx$/, ".jsx")
      filePath = filePath.replace(/\.ts$/, ".js")
    }

    await fs.writeFile(filePath, content)
  }
}
transform方法内部使用了ts-morph对组件源码进行AST解析,并根据components指定的配置对组件源码中import路径,CSS 变量,tailwind prefix 进行替换,以匹配当前项目。
import { promises as fs } from "fs"
import { tmpdir } from "os"
import { Project, ScriptKind, type SourceFile } from "ts-morph"

// 创建 project 实例
const project = new Project({
  compilerOptions: {},
})

// 使用 ts-morph 定义的 AST 转换方法
const transformers: Transformer[] = [
  transformImport,
  transformRsc,
  transformCssVars,
  transformTwPrefixes,
]

// 创建临时文件
async function createTempSourceFile(filename: string) {
  // tmpdir 使用系统的临时文件目录
  const dir = await fs.mkdtemp(path.join(tmpdir(), "shadcn-"))
  return path.join(dir, filename)
}

export async function transform(opts: TransformOpts) {
  const tempFile = await createTempSourceFile(opts.filename)
  // 使用 project.createSourceFile 根据源码创建 tsx 文件
  const sourceFile = project.createSourceFile(tempFile, opts.raw, {
    scriptKind: ScriptKind.TSX,
  })

  // 对import路径,CSS 变量,tailwind prefix
  for (const transformer of transformers) {
    transformer({ sourceFile, ...opts })
  }

  return await transformJsx({
    sourceFile,
    ...opts,
  })
}
diff
diff命令内部主要使用了diff对项目的组件代码和远端组件代码进行对比,然后输出到 shell 内,具体实现就不细说了,比较简单。
组件的注册
最后讲一下 shadcn ui 组件的注册方法,在上文对add和init命令的解析中,可以看到经常使用fetchRegistry这个方法获取远端json文件,而其默认地址就是 shadcn ui 官网的地址https://ui.shadcn.com/,所以这里就可以得出一个结论,组件注册的index.json,以及主题信息style.json等信息维护在网站目录下,也就是 shadcn 项目 monorepo 内部的apps\www目录。
在apps/www目录下的package.json中可以找到以下命令:
"scripts": {
  "build": "contentlayer build && pnpm build:registry && next build",
  "build:registry": "tsx --tsconfig ./tsconfig.scripts.json ./scripts/build-registry.mts && prettier --loglevel silent --write \"registry/**/*.{ts,tsx,mdx}\" --cache",
},
其中build:registry会使用tsx执行./scripts/build-registry.mts这个文件,其内部执行以下这段代码:
import { blocks } from "@/registry/blocks"
import { examples } from "@/registry/examples"
import { Registry } from "@/registry/schema"
import { ui } from "@/registry/ui"

const registry: Registry = [...ui, ...examples, ...blocks]

try {
  // safeParse 方法相比 parse 方法在验证失败时不会抛出错误,其返回值是一个对象,它包含两个属性:success 和 data 或 error
  const result = registrySchema.safeParse(registry)

  if (!result.success) {
    console.error(result.error)
    process.exit(1)
  }

  await buildRegistry(result.data)
  await buildStyles(result.data)
  await buildThemes()

  console.log("✅ Done!")
} catch (error) {
  console.error(error)
  process.exit(1)
}
其中@/registry/ui维护的就是所有组件的信息:
import { Registry } from "@/registry/schema"

export const ui: Registry = [
  {
    name: "accordion",
    type: "components:ui",
    dependencies: ["@radix-ui/react-accordion"],
    files: ["ui/accordion.tsx"],
  },
  ...
]
执行buildRegistry会根据@/registry/ui生成registry/index.json文件。
const REGISTRY_PATH = path.join(process.cwd(), "public/registry")

async function buildRegistry(registry: Registry) {
  const project = new Project({
    compilerOptions: {},
  })

  async function createTempSourceFile(filename: string) {
    const dir = await fs.mkdtemp(path.join(tmpdir(), "shadcn-"))
    return path.join(dir, filename)
  }

  // ----------------------------------------------------------------------------
  // Build registry/index.json.
  // ----------------------------------------------------------------------------
  const names = registry.filter((item) => item.type === "components:ui")
  const registryJson = JSON.stringify(names, null, 2)
  rimraf.sync(path.join(REGISTRY_PATH, "index.json"))
  await fs.writeFile(
    path.join(REGISTRY_PATH, "index.json"),
    registryJson,
    "utf8"
  )
}
执行buildStyles会生成包含组件源码的registry/styles/[style]/[name].json文件,这些生成的 json 文件放在public目录下,在网站部署的时候public目录的文件都会拷贝到网站部署的根目录下,所以后续就能通过域名+[json文件路径]的地址加载这些 json 文件。
// ----------------------------------------------------------------------------
// Build registry/styles/[style]/[name].json.
// ----------------------------------------------------------------------------
async function buildStyles(registry: Registry) {
  for (const style of styles) {
    const targetPath = path.join(REGISTRY_PATH, "styles", style.name)

    for (const item of registry) {
      if (item.type !== "components:ui") {
        continue
      }

      const files = item.files?.map((file) => {
        // // 对应 apps\www\registry 下组件代码路径
        const content = readFileSync(
          path.join(process.cwd(), "registry", style.name, file),
          "utf8"
        )

        return {
          name: basename(file),
          content,
        }
      })

      const payload = {
        ...item,
        files,
      }

      await fs.writeFile(
        path.join(targetPath, `${item.name}.json`),
        JSON.stringify(payload, null, 2),
        "utf8"
      )
    }
  }
}
shadcn 用到的一些 nodejs 工具
commander
注册 nodejs cli 命令以及 cli 参数,以及获取 cli 输入,执行操作等。
prompts
cli 输入交互
zod
zod 是一个用于 TypeScript 和 JavaScript 的数据验证库。它允许开发者定义一个模式(schema),这个模式描述了数据应该如何结构化,以及每个字段的类型是什么。可以在 node 和 web 环境下使用。
cosmiconfig
查找或读取json,yml等配置文件
tsconfig-paths
解析tsconfig.json中定义的paths的模块路径。
chalk
cli 打印颜色文字
ora
cli loading 交互效果
node-fetch
nodejs 中使用 fetch
tsx
支持直接在 node 命令行中执行 typescript 文件。